Set up Fastly
Fastly is required for Magento Commerce Cloud, and is used in Staging and Production environments. It works with Varnish to provide fast caching capabilities and a Content Delivery Network (CDN) for static assets. Fastly is not available in Integration environments.
This information gets you started with installing and configuring Fastly. We provide additional information for configuring backends and Origin shields, customizing error pages, and adding custom VCL snippets.
For VCL snippets, experience developing that code is required for advanced configurations.
The process for configuring Fastly includes:
- Install Fastly module in Integration
- Deploy code across Staging and Production
- Configure Fastly credentials and settings
- Advanced configurations including VCL snippets
- Enable and configure the Fastly image optimization feature (Fastly IO)
Get Fastly credentials
Magento Commerce Cloud projects do not require a dedicated Fastly account or account owner. Instead, each project environment has unique Fastly credentials (API key and service ID) that you use to configure and manage Fastly services from the Magento Admin UI. You also use these credentials to submit requests to the Fastly API service.
Before you can set up and use Fastly services for your project, Magento needs to link your project to the Fastly service account for Magento Commerce Cloud and add the Fastly account credentials to your project environment configurations.
If your project domains link to an existing Fastly service account, you must modify the configuration for the existing account before requesting Fastly credentials for your Magento Commerce Cloud project. See Multiple Fastly accounts and assigned domains.
To add your project to the Fastly service account:
Submit a support ticket to add your environments to the Fastly service account for Magento Commerce Cloud:
-
For Pro projects, include the URLs for your Production and Staging sites.
-
For Starter projects, include the URLs for your Master and Staging sites.
To view your Fastly credentials:
When we provision your project environments for Fastly services, we add the Fastly credentials to your project environment configuration. You can get these credentials using any of the following methods:
-
Fastly configuration section in the Magento Admin UI— View the credentials after you enable the Fastly module.
-
Project Web UI—Check the following environment variables in the Environment configuration section.
-
CONFIG__DEFAULT__SYSTEM__FULL_PAGE_CACHE__FASTLY__FASTLY_API_KEY -
CONFIG__DEFAULT__SYSTEM__FULL_PAGE_CACHE__FASTLY__FASTLY_SERVICE_ID
-
-
Local workspace—Use the following Magento Cloud CLI command to list and review Fastly environment variables.
1
magento-cloud variable:get -e <environment ID> -
IaaS mounted shared directory—On Pro projects, use SSH to connect to your server and get the Fastly credentials from the
/mnt/shared/fastly_tokens.txtfile.
If you need to change the Fastly API key credential for a project environment for security reasons, you can request a new API key from support. See Change Fastly credentials.
Multiple Fastly accounts and assigned domains
Fastly only allows you to assign an apex domain and associated subdomains to one Fastly service and account. If you have an existing Fastly account that links the same apex and subdomains used for your Magento Commerce Cloud, you have the following options:
-
Remove the apex and subdomains from the existing account before requesting Fastly service credentials for your Magento Commerce Cloud project environments. See Working with Domains in the Fastly documentation.
Use this option to link the apex domain and all subdomains to the Fastly service account for Magento Commerce Cloud.
-
Submit a support ticket to request domain delegation so that apex and subdomains can be linked to different accounts.
Use this option if your apex domain has multiple subdomains for Magento and non-Magento sites that you want to link to different Fastly accounts.
Request domain delegation
Scenario 1
The apex domain (testweb.com and www.testweb.com) is linked to an existing Fastly account. You have a Magento Commerce Cloud project configured with the following subdomains: mcstaging.testweb.com and mcprod.testweb.com. You do not want to move the apex domain to the Fastly service account for Magento Commerce Cloud Magento.
Submit a Fastly support ticket requesting that the subdomains be delegated from the existing Fastly account to the Fastly account for Magento Commerce Cloud. Include your Magento project ID in the ticket.
After the delegation is complete, your project subdomains can be added to the Fastly service account for Magento Commerce Cloud. See Get Fastly credentials.
Scenario 2
The apex domain (testweb.com and www.testweb.com) is linked to the Magento Commerce Cloud Fastly service account. You want to manage Fastly services for the service.testweb.com and product-updates.testweb.com subdomains from a different Fastly account.
Submit a Magento support ticket requesting that the subdomains be delegated from the Magento Commerce Cloud Fastly service account to the Fastly account. Include the service ID for the Fastly account in the ticket.
Get started
You need to install Fastly in its own branch. Fine-tuning Fastly can be a complex process, depending on your needs and store size. If you already have a branch to work in, or know how to create a branch, continue to installing Fastly.
To create a branch:
- Log in to your local development system, or switch to, the Magento file system owner.
- Change to a directory to which the Magento file system owner has write access.
-
Enter the following command in a terminal to log in to your project:
1
magento-cloud login
-
List your projects. With the project ID, you can complete additional commands.
1
magento-cloud project:list
-
If necessary, clone the project to your local. You should have cloned when setting up your local development workspace.
1
magento-cloud project:get <project ID>
- Change to a project directory. For example,
cd /var/www/html/magento2 -
List environments in the project. Every environment includes an active Git branch of your code, database, environment variables, configurations, and services.
1
magento-cloud environment:list
magento-cloud environment:list—displays environment hierarchies whereas thegit branchcommand does not. -
Fetch origin branches to get the latest code:
1
git fetch origin
-
Check out, or switch to, a specific branch and environment. Git commands only checkout the Git branch. The Magento Cloud command also switches to the active environment.
1
magento-cloud environment:checkout <environment ID>
To create a new environment, use
magento-cloud environment:branch <environment name> <parent environment ID> -
Pull any updated code to your local for the environment ID (which is the Git branch):
1
git pull origin <environment ID>
-
Create a snapshot of the environment as a backup:
1
magento-cloud snapshot:create -e <environment ID>
Install Fastly in an Integration branch and deploy
You should install the Fastly module on your local, pushing the code to Integration and deploying across to your Staging and Production environments. For Magento Commerce Cloud 2.2, install Fastly module 1.2.33 or later for all updated settings and full VCL snippet uploading support.
Don’t configure the module in your local before building and deploying. You’ll configure the module in those environments.
We recommend using the bin/magento magento-cloud:scd-dump command for
Configuration Management(2.1.X,
2.2.X).
When you use the app:config:dump command, all configuration options for Fastly
are locked and cannot be edited in Staging and Production.
We provide Fastly services only for your Staging and Production environments. You cannot use the Fastly service in Integration environments.
-
In your local environment root directory, use a terminal to enter the following commands in the order shown:
composer config repositories.fastly-magento2 git “https://github.com/fastly/fastly-magento2.git” composer require fastly/magento2
- Wait for dependencies to be updated.
-
Enter the following command to fully update and clear the cache:
php bin/magento setup:upgrade && php bin/magento cache:clean
-
Edit your composer.json and ensure the Fastly module is included with version.
- In the “require” section, you should have
"fastly/magento2": <version number> -
In the “repositories” section, you should have:
“fastly-magento2”: { “url”: “https://github.com/fastly/fastly-magento2.git” }
- In the “require” section, you should have
-
Add, commit, and push the changes to your code repository with the following command:
git add -A; git commit -m “Install Fastly”; git push origin
-
Merge the branch code with the
masterIntegration branch. - Deploy the code to Staging and Production.
After deployment, you can log in to the Admin in Staging and Production to configure Fastly credentials and settings. This gives you the flexibility to have different caching features as needed in both environments, including VCL snippets.
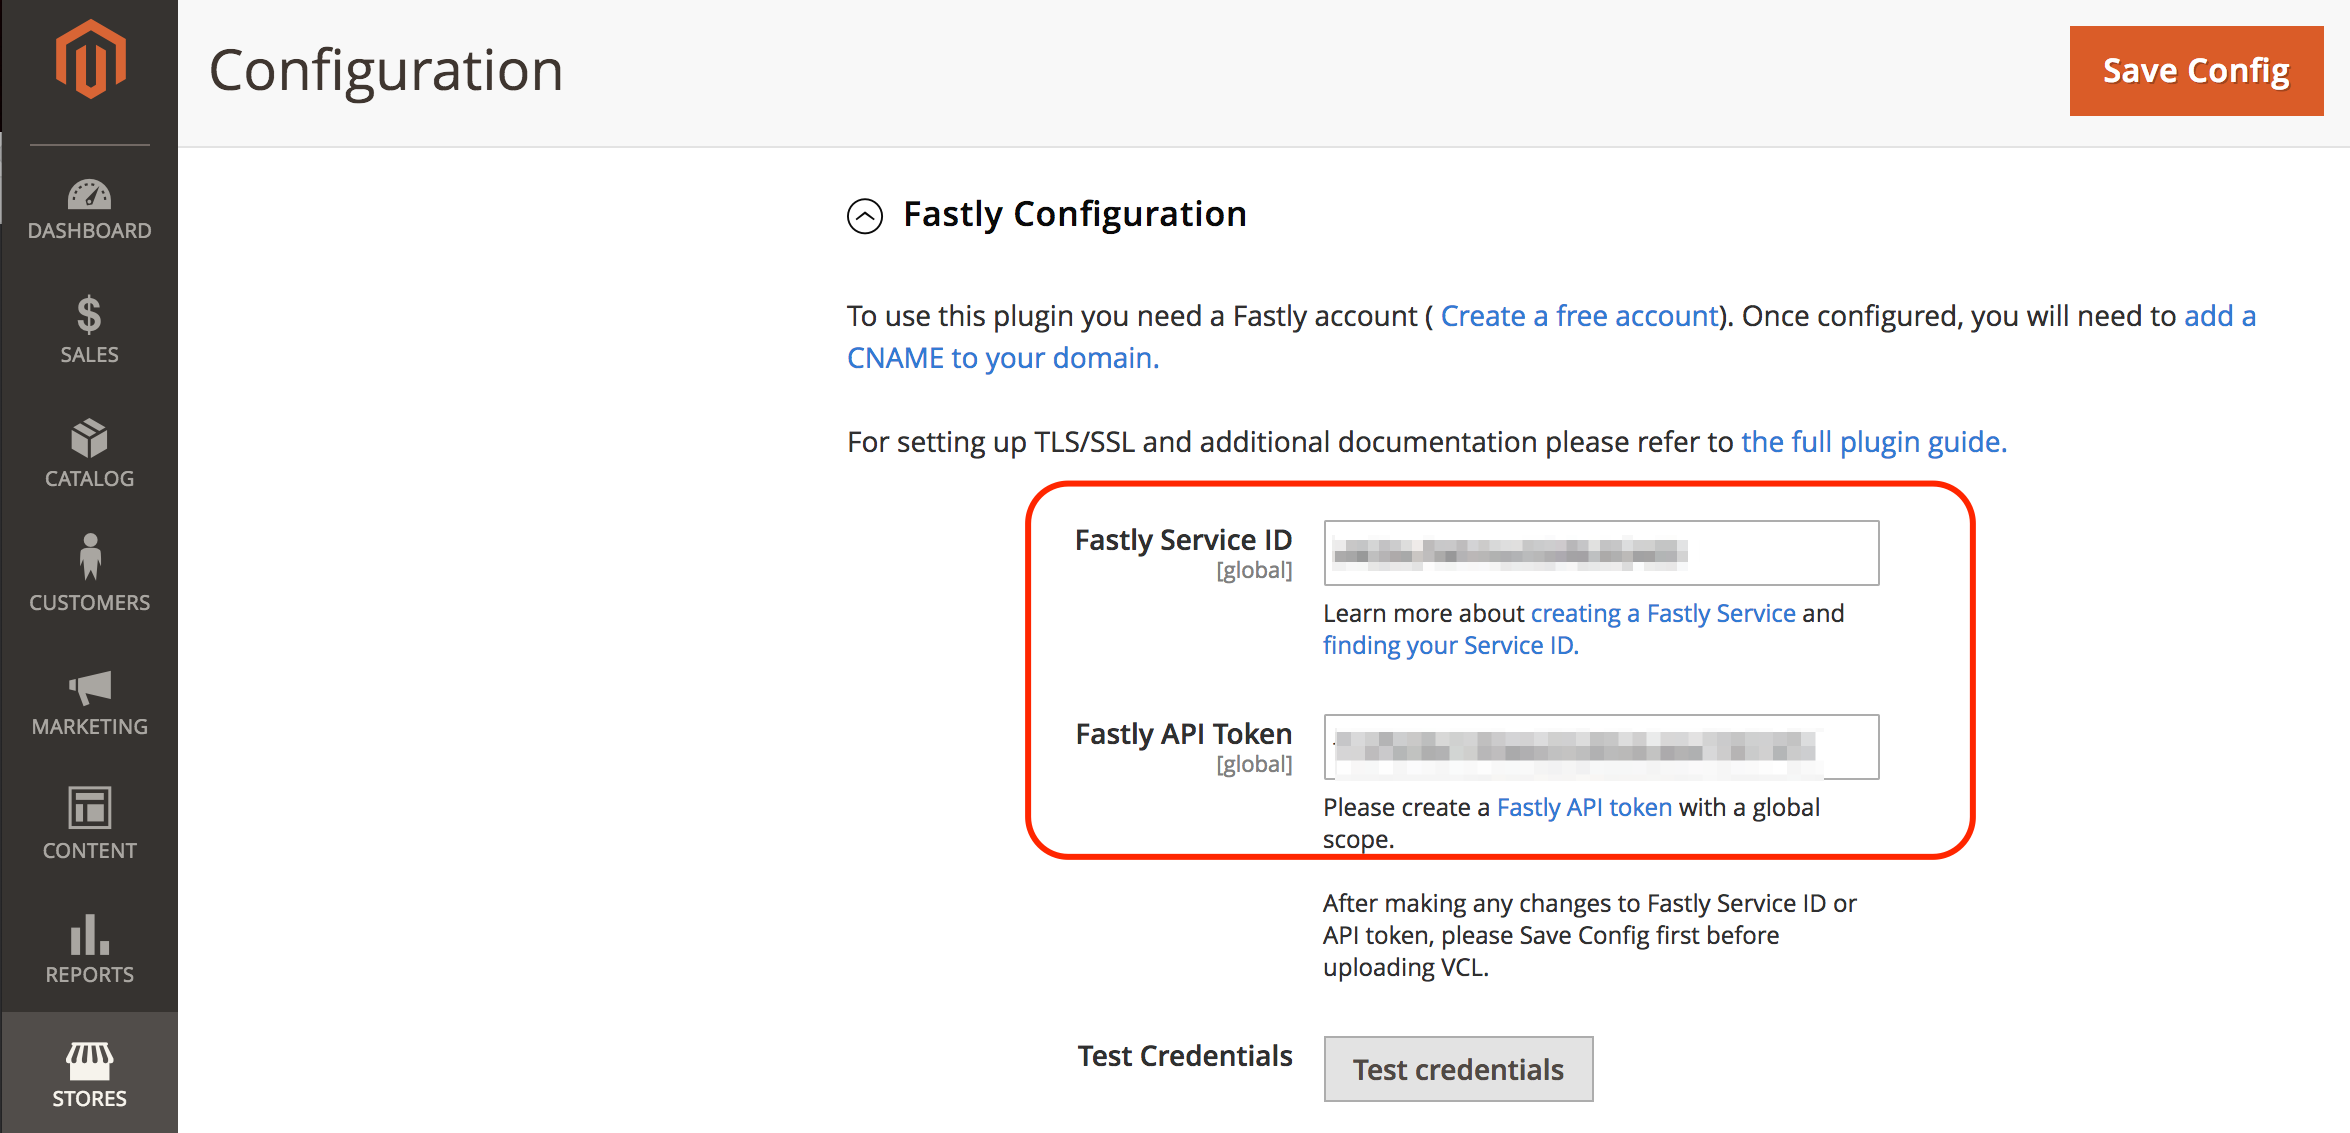
Enable and configure Fastly using the Magento Admin
To begin configuring Fastly, you need to enter and test Fastly credentials in Staging and Production. After successfully testing the credentials, you can continue with advanced configurations and VCL snippets.
We provide your Fastly Service ID and API key (or token) for Staging and Production environments. These credentials are different for each environment. Make sure to use the correct credentials.
Complete the following configuration steps in Staging and Production environments:
-
Log in to your Magento Admin UI.
-
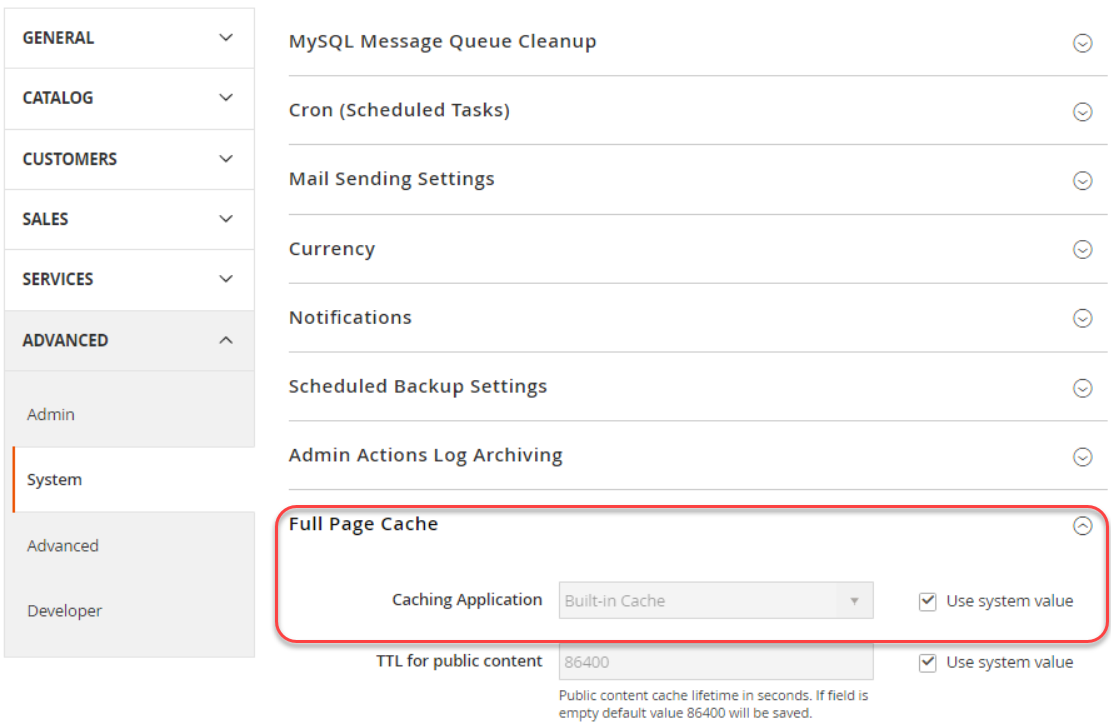
Click Stores > Settings > Configuration > Advanced > System and expand Full Page Cache.
1
{:width="650px"}
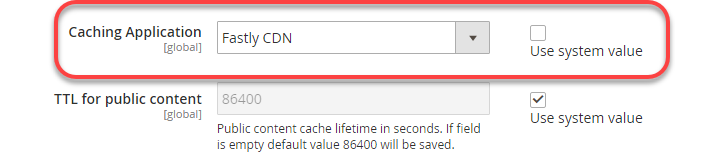
- For Caching Application, uncheck the Use system value checkbox and select Fastly CDN from the drop-down list.
1
{:width="550px"}
-
Expand Fastly Configuration and choose caching options.
-
After configuring the caching options, click Save Config at the top of the page.
-
Clear the cache according to the notification. Then, navigate back to Stores > Settings > Configuration > Advanced > System > Fastly Configuration to continue configuring Fastly.
Configure the following features and enable additional configuration options:
- Ignore the link to create a free Fastly account. We’ll provide your Fastly credentials (Service ID and API token).
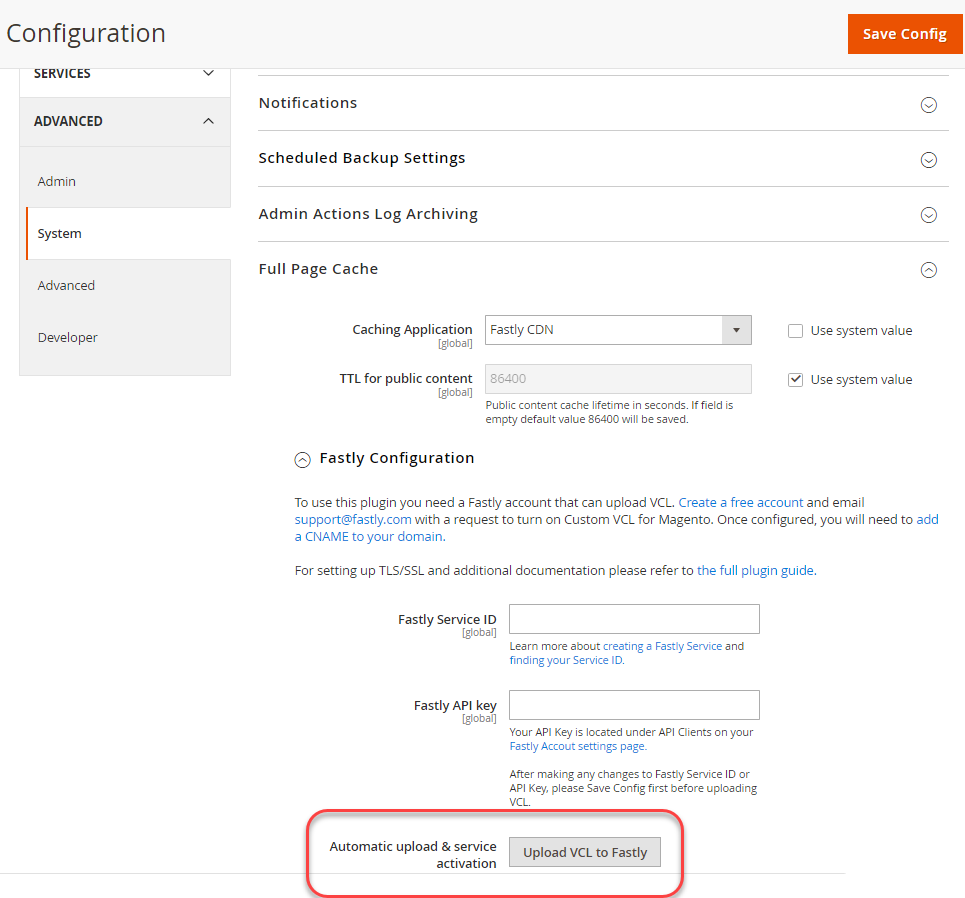
- With Fastly version 1.2.0 and later (we recommend 1.2.33 or later), use the Upload VCL to Fastly button to upload your default VCL snippets.
Upload Fastly VCL snippets
You don’t have to create or code VCL snippets. We provide a default set of snippets for Fastly. You only need to click Upload VCL to Fastly to finish this step.
The installed Fastly module includes the following default VCL snippets that drive the integration with Fastly. These VCL snippets are not available until you upload them. When you click Upload, you push a set of these default VCL snippets to Fastly for your specific Service ID and extension.
For VCL snippet developers, these default snippets are prepended with
magentomodule_ with a priority of 50. You should not use this prepended name
for your own snippets. For full details, see our guide to create and
add custom VCL snippets.
To use snippets, you must upload the Fastly VCL using the Magento Admin as follows:
- In the Fastly Configuration section, click Upload VCL to Fastly as the following figure shows.
1
2
3
4
5
6
{:#info .bs-callout .bs-callout-info}
If the **Upload VCL to Fastly** button does not display, you should
upgrade the Fastly extension to version 1.2.0 or later. We recommend 1.2.33
or later. The Fastly Composer name is `fastly/magento2`.
- Once the upload completes, the modal automatically closes with a success message.
After the upload completes, you can create and upload custom VCL snippets with advanced settings and options. You use APIs to add these VCL snippets, further adding them in your site code depending on the actions.
For more information, see Fastly VCL documentation and Fastly VCL snippets.
Configure backends and Origin shielding
Backend settings provide fine tuning for Fastly performance with Origin shielding and timeouts. A backend is a specific location (IP or domain) with configured Origin shield and timeout settings for checking and providing cached content.
Origin shielding routes all requests for your store to a specific Point of Presence (POP). When a request is received, the POP checks for cached content and provides it. If it is not cached, it continues to the Shield POP, then to the Origin server which caches the content. The shields reduce traffic directly to the origin.
You can add multiple backends. Repeat these instructions to create multiple backends. For example, you may need a backend specifically for Wordpress to handle your blog.
-
Access and expand Fastly Configuration.
-
Expand Backend settings and click the gear to configure the default backend. A modal opens with options to select and configure.
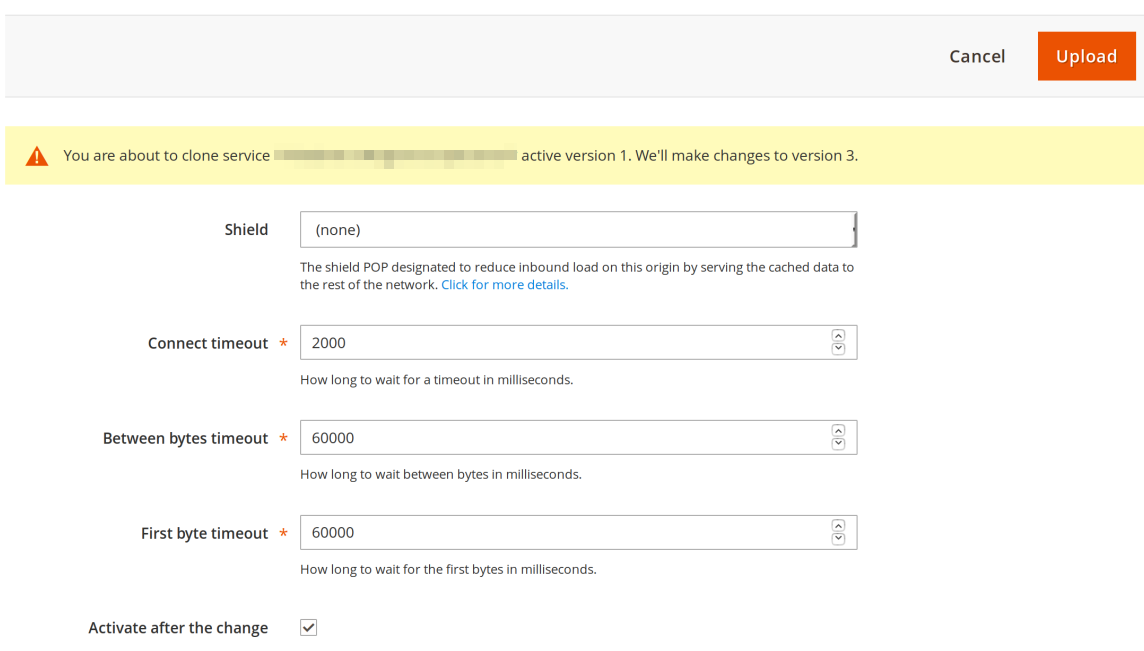
-
Select the Shield location (or datacenter) closest to your AWS region. For example, if Staging is on the west coast of the United States (us-west-1), select the
sjc-ca-usFastly shield location. This is the POP that provides caching services.The following list shows which Faslty shield locations to use based an AWS region:
- ap-northeast-1 => tokyo-jp2
- ap-southeast-1 => singapore-sg
- ap-southeast-2 => sydney-au
- ap-south-1 => singapore-sg
- eu-central-1 => frankfurt-de
- eu-west-1 => london-uk, london_city-uk
- eu-west-2 => london-uk, london_city-uk
- eu-west-3 => cdg-par-fr
- sa-east-1 => gru-br-sa
- us-east-1 => iad-va-us
- us-east-2 => iad-va-us
- us-west-1 => sjc-ca-us
- us-west-2 => sea-wa-us
-
Modify the timeout values (in microseconds) for the connection to the shield, time between bytes, and time for the first byte. We recommend keeping the default timeout settings.
-
Optionally, select to Activate the backend and Shield after editing or saving.
-
Click Upload to save. The settings are communicated to Fastly.
-
In the Magento Admin, click Save Config.
For more information from Fastly, see the Magento 2 Backend settings guide.
Configure purge options
Fastly provides multiple types of purge options on your Magento Cache Management page including purging product category, product assets, and content. When enabled, Fastly watches for events to automatically purge those caches. If you disable a purge option, you can manually purge Fastly aches after finishing updates through the Cache Management page.
The options include:
-
Purge category: Purges product category content (not product content) when you add and update a single product. You may want to keep this disabled and enable purge product, which purges products and product categories.
- Purge product: Purges all product and product category content when saving a single modification to a product. Enabling purge product can be helpful to immediately get updates to customers when changing a price, adding a product option, and when product inventory is out-of-stock.
- Purge CMS page: Purges page content when updating and adding pages to the Magento CMS. For example, you may want to purge when updating your Terms and Conditions or Return policy. If you rarely make these changes, you could disable automatic purging.
- Soft purge: Sets changed content to stale and purges according to the stale timing. In combination with the stale timings your customers will be served stale content very fast while Fastly is updating the content in the background.

To configure Fastly purge options:
-
In the Fastly Configuration section, expand Advanced.
-
All purge options display. Select “Yes” per purge option to enable automatic purging. Select “No” to disable automatic purging, allowing you to manually purge caches through the Cache Management page.
-
Click Save Config at the top of the page.
-
After the page reloads, click Upload VCL to Fastly in the Fastly Configuration section.
For more information, see the Fastly configuration options.
Create custom VCL snippets
For extensive instructions to create custom VCL snippets and needed edge dictionaries or ACLs, see Custom Fastly VCL snippets
Extend Fastly timeout for the Magento Admin
Fastly sets a 180 second-timeout for HTTPS requests to the Magento Admin, so you may encounter timeouts if you need to complete bulk actions that take longer than 3 minutes. You can manage timeouts using Fastly 1.2.41.
-
In the Fastly Configuration section, expand Advanced.
-
Set the Admin path timeout value in seconds. This value cannot be more than one hour (3600 seconds).
-
Click Save Config at the top of the page.
-
After the page reloads, click Upload VCL to Fastly in the Fastly Configuration section.
Since version 1.2.39, Fastly gets the Magento Admin path for generating the VCL
file from the app/etc/env.php configuration file.
Configure GeoIP handling
The Fastly module includes GeoIP handling to automatically redirect visitors or provide a list of stores matching their obtained country code. If you already use a Magento extension for GeoIP handling, you may need to verify the features with Fastly options.
-
In the Fastly Configuration section, expand Advanced.
-
Scroll down and select Yes to Enable GeoIP. Additional configuration options display.
-
For GeoIP Action, select if the visitor is automatically redirected with Redirect or provided a list of stores to select from with Dialog.
-
For Country Mapping, click Add to enter a two-letter country code to map with a specific Magento store from a list. For a list of country codes, see this site.
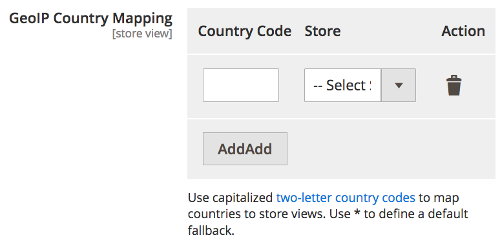
-
Click Save Config at the top of the page.
-
After page reload, click Upload VCL to Fastly in the Fastly Configuration section.
Fastly also provides a series of geolocation-related VCL features for customized geolocation coding.
Configure DNS for Fastly
You must complete these steps when you go live.
After checking with your registrar about where to change your DNS settings,
add a CNAME record for your website that points to the Fastly service:
prod.magentocloud.map.fastly.net. If you use multiple hostnames for your site,
you must add a CNAME record for each one.
This does not work for an apex domain (also referred to as a naked domain). You must use a DNS provider that supports forwarding DNS queries to use an apex domain.
The following list contains examples of DNS providers for informational purposes. Use your preferred DNS provider.
- CNAME with ALIAS record from Dyn
- ANAME record on DNS Made Easy
- ANAME at easyDNS
- ACNAME at CloudFlare
- ALIAS at PointDNS
Many other DNS providers also offer workarounds to accomplish this goal. The most
common is to add a CNAME record for the www host on the domain and then use the
DNS provider’s redirect service to redirect the apex over to the www version of
the domain. Consult your DNS provider for more information.
Another option for apex domain is to add A records, which maps a domain name to the Fastly IP addresses:
151.101.1.124151.101.65.124151.101.129.124151.101.193.124
Refer to Go live checklist for more information.
TLS and Fastly
If you use TLS with Fastly enabled in your environment, you must provide your DNS provider with a TXT record from Fastly. We provide a Domain Validated SSL certificate with Subject Alternative Name enabled, issued by GlobalSign. When entering your Support ticket for DNS information and going live, let us know you are using TLS, provide your domain names, and request the TXT record. You can then send this record to your DNS provider. The domain validation process is executed by Fastly.
For details on this TXT record, see the Fastly DNS TXT record validation.
Upgrade Fastly
Fastly updates the Magento module to resolve issues, increase performance, and provide new features. You can check the Magento Marketplace and GitHub for updates on the latest releases.
When you upgrade Fastly, you get the upgraded subset of default VCL snippets. When you finish upgrading, you must upload upgraded default VCL snippets to Fastly:
- In the Fastly Configuration section, click Upload VCL to Fastly.
- After the upload completes, the modal automatically closes with a success message.
When you upgrade, the default VCL snippets you uploaded should not be affected or require any additional steps.
For information on upgrading modules, refer to Install, manage, and upgrade modules.
If you created a custom VCL snippet using the same name as a default snippet, you may need to verify and update those snippets. We do not recommend replacing existing default snippets with custom snippets of the same name. For details on custom VCL, see Custom Fastly VCL snippets.