Set up redirects to WordPress using Fastly
The following example shows how to use a Fastly Edge Dictionary with a custom VCL snippet to redirect incoming requests from a Magento Commerce store (staging.example.com) to a separate WordPress site (customer.example.com) that hosts related content like blog posts and customer stories.
We recommend adding custom VCL configurations to a Staging environment where you can test them before running against Production.
Prerequisites
-
Configure the environment for Fastly services. See Set up Fastly.
-
Get credentials to access both the Fastly API and the Magento Admin UI for your Magento Commerce Cloud environment.
-
Identify the URL paths to redirect to the WordPress backend.
-
Submit a support ticket requesting the following Fastly service configuration changes required to use the custom VCL snippet for the WordPress redirects:
-
Add the WordPress host to the Fastly backend configuration. Include the domain name for the WordPress host.
-
Attach the following request condition to the Wordpress backend.
1
   req.http.X-WP == "1"
Incoming requests that match this request condition, which is set through the custom VCL snippet, redirect to the WordPress backend.
-
Create an Edge Dictionary of WordPress paths
Edge Dictionaries create key-value pairs accessible to VCL functions during VCL snippet processing. In this example, you create an edge dictionary that provides the list of URL paths that to redirect from your store to the WordPress backend.
-
Log in to the Magento Admin UI.
-
Click Stores > Settings > Configuration > Advanced > System.
-
Expand Full Page Cache > Fastly Configuration > Edge dictionaries.
-
Create the Dictionary container:
-
Click Add container.
-
On the Container page, enter a Dictionary name—
wordpress_urls. -
Select Activate after the change to enable the dictionary after you create it.
-
Click Upload to attach the dictionary to your Fastly service configuration.
-
-
Add the list of URLs for redirection to the the
wordpress_urlsdictionary:-
Click the Settings icon for the
wordpress_urlsdictionary.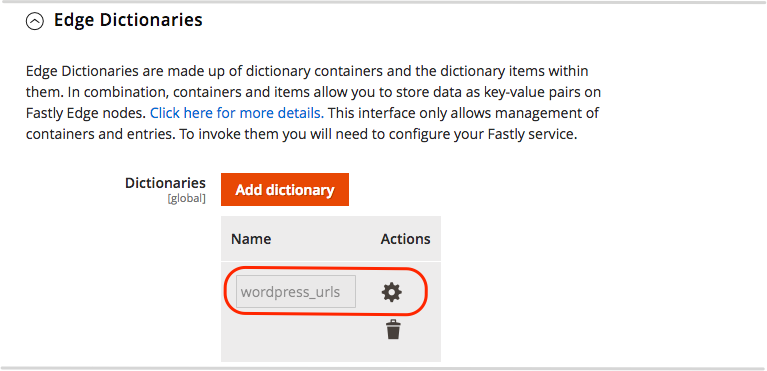
-
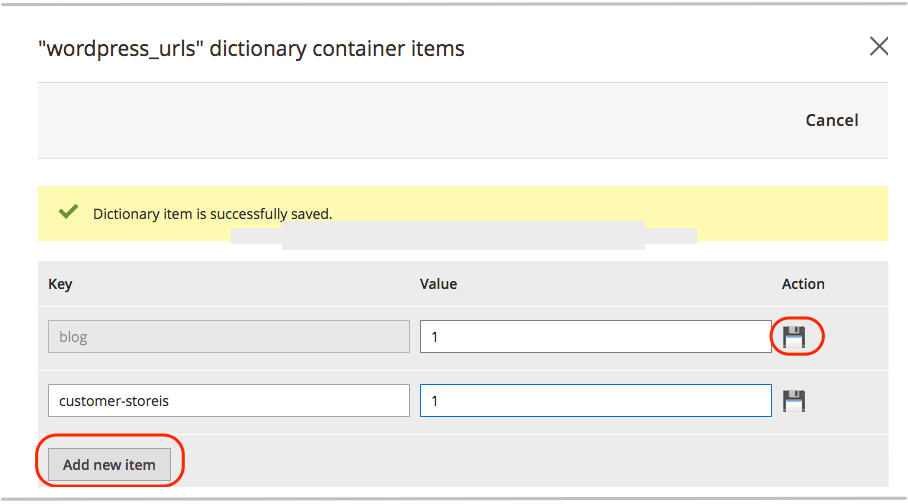
Add and save key-value pairs in the new dictionary. For this example, each Key is a URL path to redirect to the WordPress backend, and the Value is 1.
-
Click Cancel to return to the system configuration page.
-
-
Click Save Config.
-
Refresh the cache according to the notification at the top of the page.
For more information about Edge Dictionaries, see Creating and using Edge Dictionaries and custom VCL snippets in the Fastly documentation.
Create a VCL snippet for the WordPress redirect
The following custom VCL snippet code (JSON format) evaluates incoming requests and redirects those matching a path
in the wordpress_urls edge dictionary to the WordPress backend specified in the Fastly service configuration.
1
2
3
4
5
6
7
{
  "name": "wordpress_redirect",
  "dynamic": "0",
  "type": "recv",
  "priority": "5",
  "content": "if ( req.url.path ~ \"^\\/?([^\\/?]+)\") { if ( table.lookup(wordpress_urls, re.group.1, \"NOTFOUND\") != \"NOTFOUND\" ) { set req.http.X-WP = \"1\"; } }"
}
Review the example code and change values as needed:
-
name—Name for the VCL snippet. For this example, we usedwordpress_redirect. -
dynamic—Value 0 indicates a regular snippet to upload to the versioned VCL for the Fastly configuration. -
priority—Determines when the VCL snippet runs. The priority is5to run this snippet code runs before any of the default Magento VCL snippets (magentomodule_*) assigned a priority of 50. -
type—Specifies a location to insert the snippet in the versioned VCL code. This VCL is arecvsnippet type which adds the snippet code to thevcl_recvsubroutine below the default Fastly VCL code and above any objects. -
content— The snippet of VCL code to run in one line, without line breaks.In this example, the VCL code logic extracts the first segment of the path
/mypath/someotherpath, and then compares the path (mypath) to the paths in thewordpress_urlsdictionary. Requests with matching paths are redirected to the WordPress backend. See the Fastly VCL reference for information about creating Fastly VCL code snippets.
Add the custom VCL snippet to your Fastly service configuration from the Admin UI (requires Fastly module 1.2.58 or later). If you cannot access the Admin UI, save the JSON code example in a file and upload it using the Fastly API. See Creating a VCL snippet using the Fastly API.
Add the custom VCL snippet
-
Log in to the Magento Admin UI.
-
Click Stores > Settings > Configuration > Advanced > System.
-
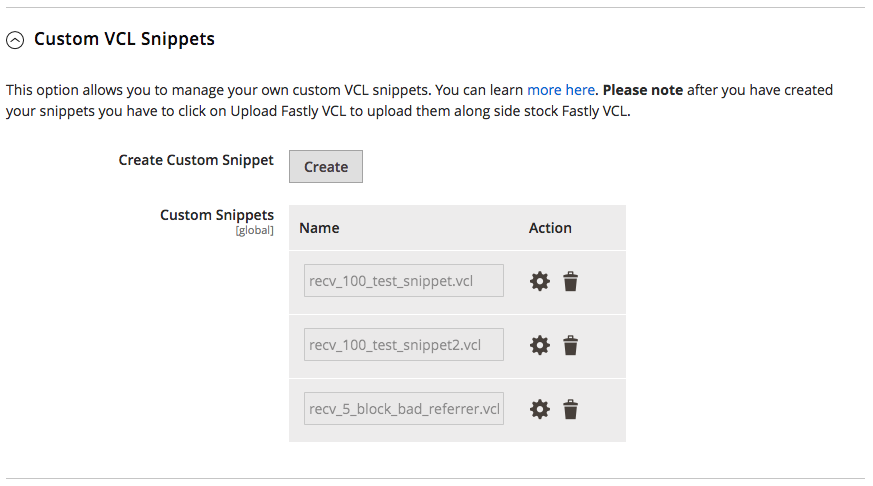
Expand Full Page Cache > Fastly Configuration > Custom VCL Snippets.
-
Click Create Custom Snippet.
-
Add the VCL snippet values:
-
Name—
wordpress_redirect -
Type—
recv -
Priority—
5 -
VCL snippet content:
1
2
3
4
5
6
if ( req.url.path ~ "^/?([^/?]+)")
  {
    if ( table.lookup(wordpress_urls, re.group.1, \"NOTFOUND\") != \"NOTFOUND\" )
      {set req.http.X-WP = "1";
      }
   }
-
-
Click Create to generate the VCL snippet file with the name pattern
type_priority_name.vcl, for examplerecv_5_wordpress_redirect.vcl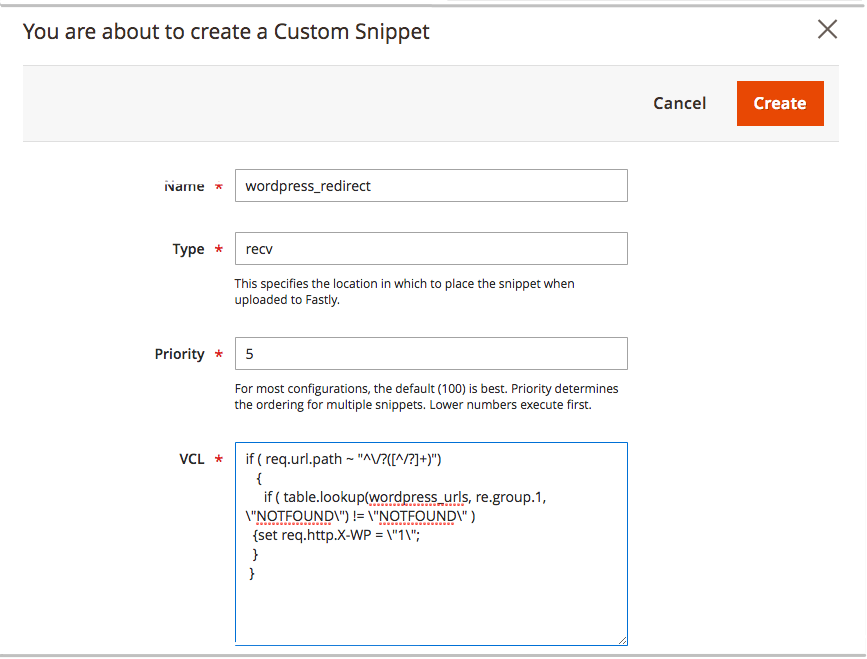
-
After the page reloads, click Upload VCL to Fastly in the Fastly Configuration section to add the file to the Fastly service configuration.
-
After the upload completes, refresh the cache according to the notification at the top of the page.
Fastly validates the updated version of the VCL code during the upload process. If the validation fails, edit the custom VCL snippet to fix the issue. Then, upload the VCL again.
Modify the custom VCL snippet
-
Log in to the Magento Admin UI.
-
Click Stores > Settings > Configuration > Advanced > System.
-
Expand Full Page Cache > Fastly Configuration > Custom VCL Snippets.
-
In the Action column, click the settings icon next to the snippet to edit.
-
After the page reloads, click Upload VCL to Fastly in the Fastly Configuration section.
-
After the upload completes, refresh the cache according to the notification at the top of the page.
The Custom VCL snippets UI option shows only the snippets added through the Admin UI. You must use the Fastly API to manage custom snippets added through the API.
Delete the custom VCL snippet
You can delete custom VCL snippet code from your Fastly configuration by uploading an empty version of the snippet from the Magento Admin UI, or delete it completely using the Fastly API.
-
Upload an empty version of the snippet file to Fastly to remove the VCL logic from the active VCL version:
-
Edit the snippet and delete the VCL snippet content.
-
Save the configuration.
-
Upload the VCL to Fastly to apply your changes.
-
-
Use the Fastly API Delete custom VCL snippet operation to delete the snippet completely, or submit a Magento support ticket to request deletion.
Instead of manually uploading custom VCL snippets, you can add snippets to the $MAGENTO_CLOUD_APP_DIR/var/vcl_snippets_custom directory in your environment. Snippets in this directory upload automatically when you click upload VCL to Fastly in the Magento Admin UI. See Automated custom VCL snippets deployment in the Fastly CDN for Magento 2 module documentation.