Common layout customization tasks
In this topic
This article describes the following typical layout customization tasks:
- Set the page layout
- Include static resources (JavaScript, CSS, fonts) in <head>
- Remove static resources (JavaScript, CSS, fonts) in <head>
- Add meta tags to the head block
- Create a container
- Reference a container
- Reference a CMS block
- Making the block visibility dynamic
- Create a block
- Set body attributes
- Set the template used by a block
- Modify block arguments
- Reference a block
- Use block object methods to set block properties
- Rearrange elements
- Add functionality to existing elements
- Modify functionality with plugins (interceptors)
To ensure stability and secure your customizations from being deleted during upgrade, do not change out-of-the-box Magento module and theme layouts. To customize your layout, create extending and overriding layout files in your custom theme.
Set the page layout
The type of page layout to be used for a certain page is defined in the page configuration file, in the layout attribute of the root <page> node.
Example:
Change the layout of Advanced Search page from default “1-column” to “2-column with left bar”. To do this, extend catalogsearch_advanced_index.xml in your theme by adding the following layout:
1
2
3
<page layout="2columns-left" xmlns:xsi="http://www.w3.org/2001/XMLSchema-instance" xsi:noNamespaceSchemaLocation="urn:magento:framework:View/Layout/etc/page_configuration.xsd">
...
</page>
Include static resources (JavaScript, CSS, fonts)
JavaScript, CSS, and other static assets are added in the <head> section of a page configuration file. The default look of a Magento store page <head> is defined by app/code/Magento/Theme/view/frontend/layout/default_head_blocks.xml. The recommended way to add CSS and JavaScript is to extend this file in your custom theme, and add the assets there.
The following file is a sample of a file you must add:
1
2
3
4
5
6
7
8
9
10
11
12
13
14
15
16
17
18
19
20
21
22
23
<page xmlns:xsi="http://www.w3.org/2001/XMLSchema-instance" xsi:noNamespaceSchemaLocation="urn:magento:framework:View/Layout/etc/page_configuration.xsd">
  <head>
    <!-- Add local styles resources -->
    <css src="css/my-styles.css" />
    <css src="<Namespace>_<Module>::css/custom-styles.css" />

    <!-- The following two ways to add local JavaScript files are equal -->
    <script src="Magento_Catalog::js/sample1.js" />
    <script src="Magento_Catalog/js/sample1.js" />

    <!-- Magento support async or defer attribute in script tag -->
    <script async="" src="Magento_Catalog::js/sample1.js" />
    <script defer="" src="Magento_Catalog::js/sample1.js" />

    <link src="js/sample.js" />
    <link src="sample.js" />

    <!-- Add external resources -->
    <css src="https://maxcdn.bootstrapcdn.com/bootstrap/3.3.4/css/bootstrap-theme.min.css" src_type="url" />
    <script src="https://maxcdn.bootstrapcdn.com/bootstrap/3.3.4/js/bootstrap.min.js" src_type="url" />
    <link rel="stylesheet" type="text/css" src="http://fonts.googleapis.com/css?family=Montserrat" src_type="url" />
  </head>
</page>
When adding external resources, specifying the src_type="url" argument value is a must.
You can use either the <link src="js/sample.js"/> or the <script src="js/sample.js"/> instruction to add a locally stored JavaScript file to your theme. This way, the path to the javascript file will be <theme_dir>/web/js/sample.js. If we use <link src="sample.js"/>, Magento will get the javascript file at <theme_dir>/web/sample.js
The path to assets is specified relatively to one the following locations:
- CSS and LESS files are stored in the
<theme_dir>/web/css/directory. - Font-related files are stored in the
<theme_dir>/<Namespace>_<Module>/web/fonts/directory. - Static assets, such as images, are stored in the
<theme_dir>/<Namespace>_<Module>/web/images/directory. - JS files are stored in the
<theme_dir>/<Namespace>_<Module>/web/js/directory.
Adding conditional comments
Conditional comments are meant to give special instructions for Internet Explorer. In the terms of adding assets, you can add CSS files to be included for a specific version of Internet Explorer. A sample follows:
1
2
3
4
5
<page xmlns:xsi="http://www.w3.org/2001/XMLSchema-instance" xsi:noNamespaceSchemaLocation="urn:magento:framework:View/Layout/etc/page_configuration.xsd">
  <head>
    <css src="css/ie-9.css" ie_condition="IE 9" />
  </head>
</page>
This adds an IE conditional comment in the generated HTML, like in the following example:
1
2
3
<!--[if IE 9]>
<link rel="stylesheet" type="text/css" media="all" href="<your_store_web_address>/pub/static/frontend/ExampleCorp/orange/en_US/css/ie-9.css" />
<![endif]-->
In this example, orange is a custom theme created by the ExampleCorp vendor.
Remove static resources (JavaScript, CSS, fonts)
To remove the static resources linked in a page <head>, make a change similar to the following in a theme extending app/design/frontend/<Vendor>/<theme>/Magento_Theme/layout/default_head_blocks.xml:
1
2
3
4
5
6
7
8
9
10
11
12
13
14
15
16
<page xmlns:xsi="http://www.w3.org/2001/XMLSchema-instance" xsi:noNamespaceSchemaLocation="urn:magento:framework:View/Layout/etc/page_configuration.xsd">
   <head>
    <!-- Remove local styles resources -->
    <remove src="css/styles-m.css" />
    <remove src="<Namespace>_<ModuleName>::css/styles.css" />

    <!-- Remove js resources -->
    <remove src="my-js.js" />
    <remove src="Magento_Catalog::js/sample1.js" />

    <!-- Remove external resources -->
    <remove src="https://maxcdn.bootstrapcdn.com/bootstrap/3.3.4/css/bootstrap-theme.min.css" />
    <remove src="https://maxcdn.bootstrapcdn.com/bootstrap/3.3.4/js/bootstrap.min.js" />
    <remove src="http://fonts.googleapis.com/css?family=Montserrat" />
   </head>
</page>
Note, that if a static asset is added with a module path (for example Magento_Catalog::js/sample.js) in the initial layout, you need to specify the module path as well when removing the asset.
If js files are called via the RequireJS approach: by declaring in the require/define sections, we cannot remove it from the layout.
Add meta tags to the head block
To add <meta> tags to the <head> element of your layout, create a theme-extending file similar to: app/design/frontend/<Vendor>/<theme>/Magento_Theme/layout/default_head_blocks.xml.
By default, the class that renders the <meta> tags is \Magento\Framework\View\Page\Config\Renderer. This class can render five meta types and a catch-all (the default).]
- og:
- charset
- content_type
- x_ua_compatible
- media_type
- “default” case
Examples: Use the following examples to include in your own layout themes.
1
2
3
4
5
6
7
8
9
10
11
12
13
14
15
16
<page xmlns:xsi="http://www.w3.org/2001/XMLSchema-instance" xsi:noNamespaceSchemaLocation="urn:magento:framework:View/Layout/etc/page_configuration.xsd">
   <head>
    <!-- This will create a tag like '<meta http-equiv="X-UA-Compatible" content="IE=edge,chrome=1">' -->
    <meta name="x_ua_compatible" content="IE=edge,chrome=1"/>
    <!-- This will create a tag like '<meta property="og:type" content="article"/>'' -->
    <meta name="og:type" content="article"/>
    <!-- This will create a tag like '<meta charset="UTF-8">' -->
    <meta name="charset" content="UTF-8"/>
    <!-- This will create a tag like '<meta http-equiv="Content-Type" content="content-type-value"/>' -->
    <meta name="content_type" content="content-type-value"/>
    <!-- This tag will not render (see \Magento\Framework\View\Page\Config\Renderer for details) -->
    <meta name="media_type" content="any-value"/>
    <!-- This will create a tag like '<meta name="my_custom_type" content="my_custom_value"/>' -->
    <meta name="my_custom_type" content="my_custom_value"/>
   </head>
</page>
Create a container
Use the following sample to create (declare) a container:
1
<container name="some.container" as="someContainer" label="Some Container" htmlTag="div" htmlClass="some-container" />
Reference a container
To update a container use the <referenceContainer> instruction.
Example: add links to the page header panel.
1
2
3
4
5
6
7
<referenceContainer name="header.panel">
  <block class="Magento\Framework\View\Element\Html\Links" name="header.links">
    <arguments>
      <argument name="css_class" xsi:type="string">header links</argument>
    </arguments>
  </block>
</referenceContainer>
To wrap div or block using container see example:
1
2
3
4
5
6
7
<container name="some.container" as="someContainer" label="Some Container" htmlTag="div" htmlClass="some-container">
  <block class="Magento\Framework\View\Element\Html\Links" name="header.links">
    <arguments>
      <argument name="css_class" xsi:type="string">header links</argument>
    </arguments>
  </block>
</container>
To add new classes to the container:
1
<referenceContainer name="page.wrapper" htmlClass="my-new-page-wrapper-class second-class"/>

This method overrides existing classes.
To add a new ID to the container:
1
<referenceContainer name="page.wrapper" htmlId="MyWrapper"/>
To remove a container from the layout:
1
<referenceContainer name="product.info.stock.sku" remove="true"/>
Create a block
Blocks are created (declared) using the <block> instruction.
Example: add a block with a product SKU information.
1
2
3
4
5
6
7
<block class="Magento\Catalog\Block\Product\View\Description" name="product.info.sku" template="Magento_Catalog::product/view/attribute.phtml" after="product.info.type">
  <arguments>
    <argument name="at_call" xsi:type="string">getSku</argument>
    <argument name="at_code" xsi:type="string">sku</argument>
    <argument name="css_class" xsi:type="string">sku</argument>
  </arguments>
</block>
Declare the template attribute with the name of the module it belongs to: template="<VendorName>_<ModuleName>::path-to-template.phtml". Following this approach avoids failures with template rendering and makes it easier for the developer to find and navigate to the template file.
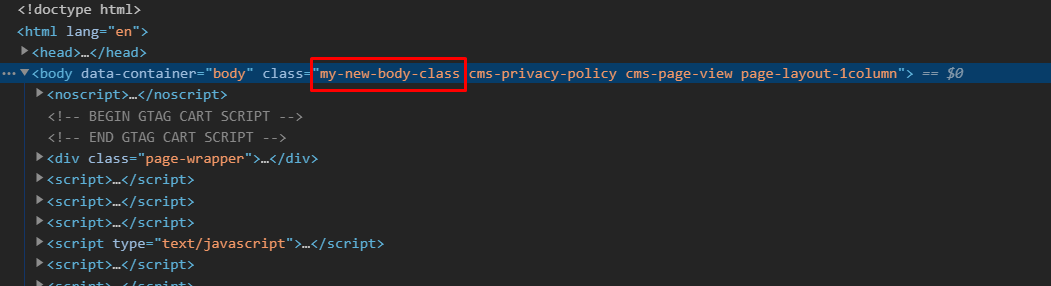
Set body attributes
To set attributes for the HTML body tag use the <attribute> instruction.
Example: Add a new class to the body tag.
1
2
3
    <body>
        <attribute name="class" value="my-new-body-class"/>
    </body>
Example: Add a custom attribute to the body tag.
1
2
3
4
5
<page>
    <body>
        <attribute name="data-role" value="my-body-role"/>
    </body>
</page>
Example: Add an id to the body tag.
1
2
3
4
5
<page>
    <body>
        <attribute name="id" value="my-new-body-id"/>
    </body>
</page>
It is not recommended to set the body id in layout files that have a wider impact (e.g. default.xml).
Example: Add an inline style to the body tag.
1
2
3
4
5
<page>
    <body>
        <attribute name="style" value="opacity:0;"/>
    </body>
</page>
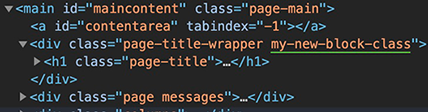
Reference a block
To update a block use the <referenceBlock> instruction.
Example: pass the image to the logo block.
1
2
3
4
5
<referenceBlock name="logo">
  <arguments>
    <argument name="logo_file" xsi:type="string">images/logo.png</argument>
  </arguments>
</referenceBlock>
To add a new class to the block:
1
2
3
4
5
<referenceBlock name="page.main.title">
    <arguments>
        <argument name="css_class" xsi:type="string">my-new-block-class</argument>
    </arguments>
</referenceBlock>
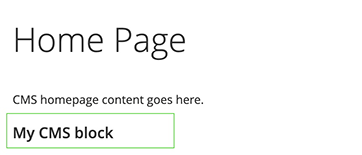
Reference a CMS block
A CMS block is injected into the layout by using the Magento/Cms/Block/Block class with the block_id argument. Any block or container can be used as a reference.
1
2
3
4
5
6
7
8
<referenceContainer name="content.bottom">
    <block class="Magento\Cms\Block\Block" name="block_identifier">
        <arguments>
            <!-- Here is the CMS Block id -->
            <argument name="block_id" xsi:type="string">my_cms_block_identifier</argument>
        </arguments>
    </block>
</referenceContainer>
As a result, the CMS block added to the bottom of the page.
Making the block visibility dynamic
Any block can be configured to show or not based on a Magento/Config/Model/Config/Source/Yesno system configuration field, using the ifconfig argument. For the value, use the XPath to the needed field.
1
2
3
<block class="Namespace\Module\Block\Type" name="block.example" ifconfig="my/yesno/field">
    ...
</block>
The visibility can also be adjusted using the ACL Resource. Although it is used mostly in the admin area, the same approach works for the storefront as well.
1
2
3
<block class="Namespace\Module\Block\Type" name="block.example" aclResource="Vendor_ModuleName::acl_name">
    <!-- ... -->
</block>
In the admin area, this is implemented for global search and for admin notification list.
Set the template used by a block
There are three ways to set the template for a block:
- using the
templateattribute - using the
<argument>instruction - using the
<action method="setTemplate">instruction
Each approach is demonstrated in the following examples:
Example 1: using the template attribute
1
 <referenceBlock name="page.main.title" template="%Namespace_Module::new_template.phtml%"/>
Example 2: using the <argument> instruction
1
2
3
4
5
 <referenceBlock name="page.main.title">
   <arguments>
     <argument name="template" xsi:type="string">%Namespace_Module::new_template.phtml%</argument>
   </arguments>
 </referenceBlock>
Example 3: using the <action method="setTemplate"> instruction
1
2
3
4
5
 <referenceBlock name="page.main.title">
   <action method="setTemplate">
     <argument name="template" xsi:type="string">%Namespace_Module::new_template.phtml%</argument>
   </action>
 </referenceBlock>
In the above examples, the template is specified according to the following:
Namespace_Module:defines the module the template belongs to. For example,Magento_Catalog.new_template.phtml: the path to the template relative to thetemplatesdirectory. For example:<module_dir>/view/<area>/templatesor<theme_dir>/<Namespace_Module>/templates.
The highest priority template is one with setTemplate action <action method="setTemplate">. Second priority has the attribute specified as <referenceBlock name="..." template="..."/>, and the lowest priority has the template using <argument>.
It means, that if for a certain block, a template is set as an attribute, it will override the value you specify in <argument> for the same block. In the case where we have <action method="setTemplate"> construction - it will override the values that you specified in the template attribute <referenceBlock name="..." template="..."/> and the value you specified using <argument>.
Modify block arguments
Magento 2.3.2 added a shared attribute. Now, instances of the view models are shared by default. If a view model is required to be a new instance each time, you must add the attribute shared="false" on the argument node in the layout xml file.
To modify block arguments, use the <referenceBlock> instruction.
Example: change the value of the existing block argument and add a new argument.
Initial block declaration:
1
2
3
4
5
<block class="Namespace_Module_Block_Type" name="block.example">
  <arguments>
    <argument name="label" xsi:type="string">Block Label</argument>
  </arguments>
</block>
Extending layout:
1
2
3
4
5
6
7
8
<referenceBlock name="block.example">
  <arguments>
    <!-- Modified block argument -->
    <argument name="label" xsi:type="string">New Block Label</argument>
    <!-- Newly added block argument -->
    <argument name="custom_label" xsi:type="string">Custom Block Label</argument>
  </arguments>
</referenceBlock>
Use block object methods to set block properties
There are two ways to access block object methods:
- using the
<argument>instruction for<block>or<referenceBlock> - using the
<action>instruction. This way is not recommended, but can be used for calling those methods, which are not refactored yet to be accessed through<argument>.
Example 1: Set a CSS class and add an attribute for the product page using <argument>.
Extending layout:
1
2
3
4
5
6
<referenceBlock name="page.main.title">
  <arguments>
    <argument name="css_class" xsi:type="string">product</argument>
    <argument name="add_base_attribute" xsi:type="string">itemprop="name"</argument>
  </arguments>
</referenceBlock>
Example 2: Set a page title using <action>.
Do not use <action> if the method implementation allows calling it using <argument> for <block> or <referenceBlock>.
Extending layout:
1
2
3
4
5
<referenceBlock name="page.main.title">
  <action method="setPageTitle">
    <argument translate="true" name="title" xsi:type="string">Catalog Advanced Search</argument>
  </action>
</referenceBlock>
Rearrange elements
In layout files you can change the elements order on a page. This can be done using one of the following:
<move>instruction: allows changing elements’ order and parent.beforeandafterattributes of<block>: sets the order of elements within a parent.
Example of <move> usage:
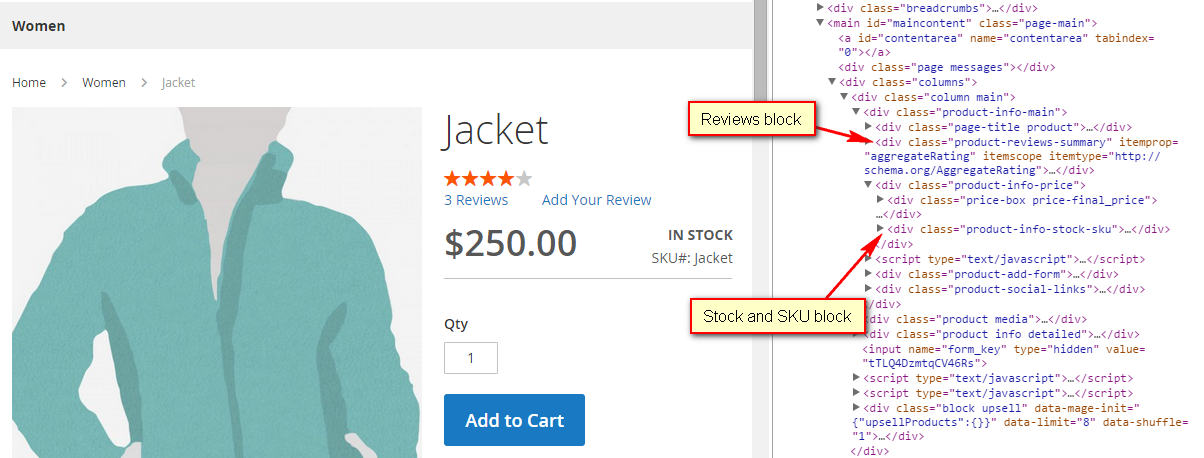
put the stock availability and SKU blocks next to the product price on a product page.
In the Magento Blank theme these elements are located as follows:
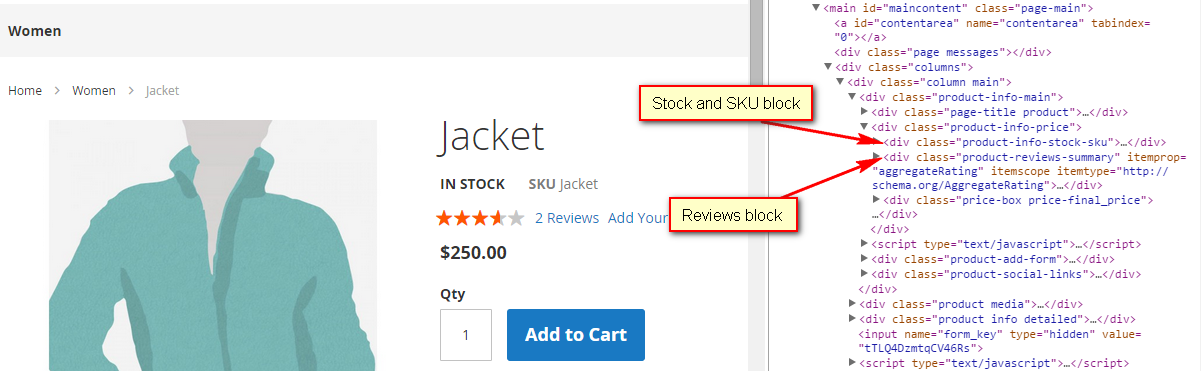
Place the stock availability and SKU blocks after product price block on a product page, and move the review block out of the product-info-price container.
To do this, add the extending catalog_product_view.xml in the app/design/frontend/ExampleCorp/orange/Magento_Catalog/layout/ directory:
1
2
3
4
5
6
<page layout="1column" xmlns:xsi="http://www.w3.org/2001/XMLSchema-instance" xsi:noNamespaceSchemaLocation="urn:magento:framework:View/Layout/etc/page_configuration.xsd">
  <body>
    <move element="product.info.stock.sku" destination="product.info.price" after="product.price.final"/>
    <move element="product.info.review" destination="product.info.main" before="product.info.price"/>
  </body>
</page>
This would make the product page look like following:
To learn how to locate the layout file you need to customize, see Locate templates, layouts, and styles.
Add functionality to existing elements
Let us say that we want to add functionality to a core template with custom logic using a ViewModel in the cart/item/default.phtml template found in Magento/Checkout/view/frontend/layout/checkout_cart_item_renderers.xml:
1
2
3
4
5
6
7
8
9
<?xml version="1.0"?>
<page xmlns:xsi="http://www.w3.org/2001/XMLSchema-instance" xsi:noNamespaceSchemaLocation="urn:magento:framework:View/Layout/etc/page_configuration.xsd">
<body>
  <referenceBlock name="checkout.cart.item.renderers.default">
    <arguments>
      <argument name="view_model" xsi:type="object">Vendor\CustomModule\ViewModel\Class</argument>
    </arguments>
  </referenceBlock>
</body>
You would also have to implement the right interface in your viewModel class (i.e. ArgumentInterface):
1
2
3
4
5
6
7
8
9
10
11
12
13
14
namespace Vendor\CustomModule\ViewModel;

class Class implements \Magento\Framework\View\Element\Block\ArgumentInterface
{
    public function __construct()
    {

    }

    public function canShowAdditionalData()
    {
        return true;
    }
}
Then, in the cart/item/default.phtml file, use the viewModel:
1
2
3
4
/** @var \Vendor\CustomModule\ViewModel\Class $viewModel */
$viewModel = $block->getViewModel();

$viewModel->canShowAdditionalData();
The name provided to the $block->getData() function should match the name of the view model provided in the xml file.
Modify layout with plugins (interceptors)
Plugins can be also useful, when we need to make some layout updates.
Here is an example of how a css class can be added to <body> tag on product view page.
etc/frontend/di.xml
1
2
3
4
5
6
7
8
<?xml version="1.0"?>
<config xmlns:xsi="http://www.w3.org/2001/XMLSchema-instance"
        xsi:noNamespaceSchemaLocation="urn:magento:framework:ObjectManager/etc/config.xsd">
    <type name="Magento\Catalog\Helper\Product\View">
        <plugin name="add_custom_body_class_to_product_page"
                type="ExampleCorp\Learning\Plugin\AddBodyClassToProductPagePlugin"/>
    </type>
</config>
ExampleCorp/Learning/Plugin/AddBodyClassToProductPagePlugin.php
1
2
3
4
5
6
7
8
9
10
11
12
13
14
15
16
17
18
19
20
21
22
23
24
25
26
27
28
29
30
31
32
33
34
35
36
37
<?php

namespace ExampleCorp\Learning\Plugin;

use Magento\Catalog\Helper\Product\View as ProductViewHelper;
use Magento\Framework\View\Result\Page;

/**
 * Class AddBodyClassToProductPagePlugin
 */
class AddBodyClassToProductPagePlugin
{
    /**
     * Adding a custom class to body
     *
     * @param ProductViewHelper $subject
     * @param Page $resultPage
     * @param $product
     * @param $params
     *
     * @return array
     */
    public function beforeInitProductLayout(
        ProductViewHelper $subject,
        Page $resultPage,
        $product,
        $params
    ): array {
        $pageConfig = $resultPage->getConfig();

        if (/*add your logic here*/) {
            $pageConfig->addBodyClass('my-new-body-class');
        }

        return [$resultPage, $product, $params];
    }
}
As result, the <body> tag has a new my-new-body-class class on all product pages.
For more information about Plugins, refer to Plugins in Magento
Manage the ‘My Account’ dashboard navigation links
You can remove navigation links from the ‘My Account’ dashboard on the storefront by setting the remove attribute.
1
2
3
4
5
6
7
8
9
10
11
12
13
14
15
16
17
18
19
20
21
22
23
24
25
26
27
28
29
30
31
32
33
34
35
36
37
38
39
40
41
42
43
44
45
46
47
48
49
50
51
52
53
54
55
56
57
58
59
60
61
62
63
64
65
66
67
68
69
70
71
72
73
<!-- ################################## -->
<!-- Magento version: Open Source -->
<!-- ################################## -->

<!-- File:  app/design/frontend/<Vendor>/<theme>/Magento_Customer/layout/customer_account.xml -->
<!-- "My Account" link -->
<referenceBlock name="customer-account-navigation-account-link" remove="true"/>

<!-- "Address Book" link -->
<referenceBlock name="customer-account-navigation-address-link" remove="true"/>

<!-- "Account Information" link -->
<referenceBlock name="customer-account-navigation-account-edit-link" remove="true"/>

<!-- File:  app/design/frontend/<Vendor>/<theme>/Magento_Downloadable/layout/customer_account.xml -->
<!-- "My Downloadable Products" link -->
<referenceBlock name="customer-account-navigation-downloadable-products-link" remove="true"/>

<!-- File:  app/design/frontend/<Vendor>/<theme>/Magento_Newsletter/layout/customer_account.xml -->
<!-- "Newsletter Subscriptions" link -->
<referenceBlock name="customer-account-navigation-newsletter-subscriptions-link" remove="true"/>

<!-- File:  app/design/frontend/<Vendor>/<theme>/Magento_Paypal/layout/customer_account.xml -->
<!-- "Billing Agreements" link -->
<referenceBlock name="customer-account-navigation-billing-agreements-link" remove="true"/>

<!-- File:  app/design/frontend/<Vendor>/<theme>/Magento_Review/layout/customer_account.xml -->
<!-- "My Product Reviews" link -->
<referenceBlock name="customer-account-navigation-product-reviews-link" remove="true"/>

<!-- File:  app/design/frontend/<Vendor>/<theme>/Magento_Sales/layout/customer_account.xml -->
<!-- "My Orders" link -->
<referenceBlock name="customer-account-navigation-orders-link" remove="true"/>

<!-- File:  app/design/frontend/<Vendor>/<theme>/Magento_Vault/layout/customer_account.xml -->
<!-- "Stored Payment Methods" link -->
<referenceBlock name="customer-account-navigation-my-credit-cards-link" remove="true"/>

<!-- File:  app/design/frontend/<Vendor>/<theme>/Magento_Wishlist/layout/customer_account.xml -->
<!-- "My Wish List" link -->
<referenceBlock name="customer-account-navigation-wish-list-link" remove="true"/>

<!-- ################################### -->
<!-- Magento version: Commerce -->
<!-- ################################### -->

<!-- File:  app/design/frontend/<Vendor>/<theme>/Magento_AdvancedCheckout/layout/customer_account.xml -->
<!-- "Order by SKU" link -->
<referenceBlock name="customer-account-navigation-checkout-sku-link" remove="true"/>

<!-- File:  app/design/frontend/<Vendor>/<theme>/Magento_CustomerBalance/layout/customer_account.xml -->
<!-- "Store credit" link -->
<referenceBlock name="customer-account-navigation-customer-balance-link" remove="true"/>

<!-- File:  app/design/frontend/<Vendor>/<theme>/Magento_GiftCardAccount/layout/customer_account.xml -->
<!-- "Gift card" link -->
<referenceBlock name="customer-account-navigation-gift-card-link" remove="true"/>

<!-- File:  app/design/frontend/<Vendor>/<theme>/Magento_GiftRegistry/layout/customer_account.xml -->
<!-- "Gift Registry" link -->
<referenceBlock name="customer-account-navigation-giftregistry-link" remove="true"/>

<!-- File:  app/design/frontend/<Vendor>/<theme>/Magento_Invitation/layout/customer_account.xml -->
<!-- "My Invitations" link -->
<referenceBlock name="customer-account-navigation-magento-invitation-link" remove="true"/>

<!-- File:  app/design/frontend/<Vendor>/<theme>/Magento_Reward/layout/customer_account.xml -->
<!-- "Reward Points" link -->
<referenceBlock name="customer-account-navigation-reward-link" remove="true"/>

<!-- File:  app/design/frontend/<Vendor>/<theme>/Magento_Rma/layout/customer_account.xml -->
<!-- "My Returns" link -->
<referenceBlock name="customer-account-navigation-return-history-link" remove="true"/>
Create cms-page/product/category-specific selectable layouts
As of Magento 2.3.4, merchants can select layout updates to be applied to specific Category/Product/CMS Page pages on the frontend. These layout updates are made by creating layout XML files following specific naming conventions.
Selectable layout updates can only be loaded from the global store theme and work only in the single website with single theme configurations.
If a specific entity like cms-page/product/category has an individual theme applied in the design configuration tab, the selected theme will have priority over the selected layout update.
For Categories:
catalog_category_view_selectable_<Category ID>_<Layout Update Name>.xml
where:
- Category ID is desired category ID
- Layout Update Name is what is shown as the option for Custom layout update field of Design section on Category Edit page.
For Products:
catalog_product_view_selectable_<Product SKU>_<Layout Update Name>.xml
where:
- Product SKU is the desired product’s SKU encoded as a URI. example: “My Product SKU” -> “My%20Product%20SKU”
- Layout Update Name is what is shown as the option for Custom layout update field of Design section on Product Edit page
For CMS Pages:
cms_page_view_selectable_<CMS Page Identifier>_<Layout Update Name>.xml
where:
- CMS Page Identifier is the desired page’s URL Key with “/” symbols replaced with “_”.
- Layout Update Name is what is shown as the option for the Custom layout update field of the Design section on the CMS Page Edit page. For example, a layout update for an “About Us” page will be “cms_page_view_selectable_about-us_AboutUs.xml”.
These files must be placed in the appropriate folders for layout XML files. They will be available as Custom Layout Update options for Merchants after flushing the cache.
Related topics